Showing posts with label Pies. Show all posts

Friday, May 15, 2020

Cherry Dump Cake


A buttery crumb topping over pecans, coconut, pineapple, and warm cherry pie filling?  Yes, please!  Cherry Dump Cake is more like a cobbler than a cake, but one thing that can be agreed upon is that it is easy and delicious! 🍒


Cherry Dump Cake

1 (20 oz.) can crushed pineapple in juice, undrained
1 (21 oz.) can cherry pie filling
1 cup coconut (optional)
1/2 cup chopped pecans (optional)
1 yellow cake mix
1 1/2 sticks of butter (3/4 cup)
Optional topping:  ice cream or whipped cream

Preheat oven to 350 degrees.  Spray a 9x13 baker with a non-stick cooking spray.  In order, spread evenly in the baker:  the crushed pineapple with juice, cherry pie filling (spoon on top of pineapple--you will not cover all of the pineapple), coconut, and chopped pecans.  Sprinkle the cake mix evenly over the top.  Slice the butter putting the slices down into the cake mixture.  (See photo.)  Bake for 1 hour.  Serve warm or at room temperature with ice cream or whipped cream if desired.  Store in refrigerator.


Notes:

1)  Slice the butter putting the slices down into the cake mixture:


2)  Cake mixes can sometimes be lumpy, and if so, I sift mine before putting it on top.

3)  This dessert has a very moist texture.  You may not think it's done baking after an hour, because the inside is soft, but that is normal.  There may be some dry areas of cake mix on top, too.  That is also normal.

Friday, February 28, 2020

Pressure Cooker Beef Pot Pie and Tutorial


For years, my husband has asked that I come up with a beef pot pie recipe that would surpass any that you could get at a restaurant or buy at a grocery store.  Once I got my pressure cooker, I knew the perfect filling was possible and in less time than preparing it in a Dutch oven.  After many, many tries, I finally succeeded.  I hope you enjoy this recipe as much as we do!


 Pressure Cooker Beef Pot Pie

Yield:  6 servings
Approximate Total Time:  2 hours, 45 minutes
Electric Pressure Cooker Size:  6 quarts

3/4 cup frozen peas
1 1/2 pounds beef stew meat (do not use beef stew meat labeled lean)
3/4 cup chopped onion
3 cloves of garlic, minced or 1 1/2 teaspoons of jarred minced garlic
3 cups beef broth, divided
3/4 tsp. dried thyme
1 bay leaf
1 1/2 cups diced red potatoes
3/4 cup diced carrots
4 Tbsp. cornstarch
4 Tbsp. milk
Salt and pepper to taste
1 box refrigerated pie crusts

Measure out peas and set aside to thaw.  Cut any large stew meat pieces into bite-size chunks and remove any fat.  Add stew meat to the pressure cooker pot along with the onion, garlic, 1 1/2 cups beef broth, thyme, and bay leaf.  Stir.  Lock the pressure cooker lid in place and set steam vent to Sealing.  Select PRESSURE COOK (Manual) and cook for 30 minutes on High pressure.
 

While it's cooking, cut up the potatoes (with or without the skin--I prefer with) and carrots into 1/2-inch pieces.
 
When the 30-minute cook time ends, let the pressure release naturally for 10 minutes, and then open the steam vent to release any remaining pressure (Quick Release).  When the valve drops, carefully remove the lid.  Remove bay leaf.

Add the potatoes, carrots, and peas.  (You can stir them in or just add them on top.) Lock the pressure cooker lid in place and set steam vent to Sealing.  Select PRESSURE COOK (Manual) and cook for 3 minutes on High pressure.  After the 3 minutes have passed, open the steam vent to release pressure (Quick Release).  Carefully remove the lid.  Select CANCEL.

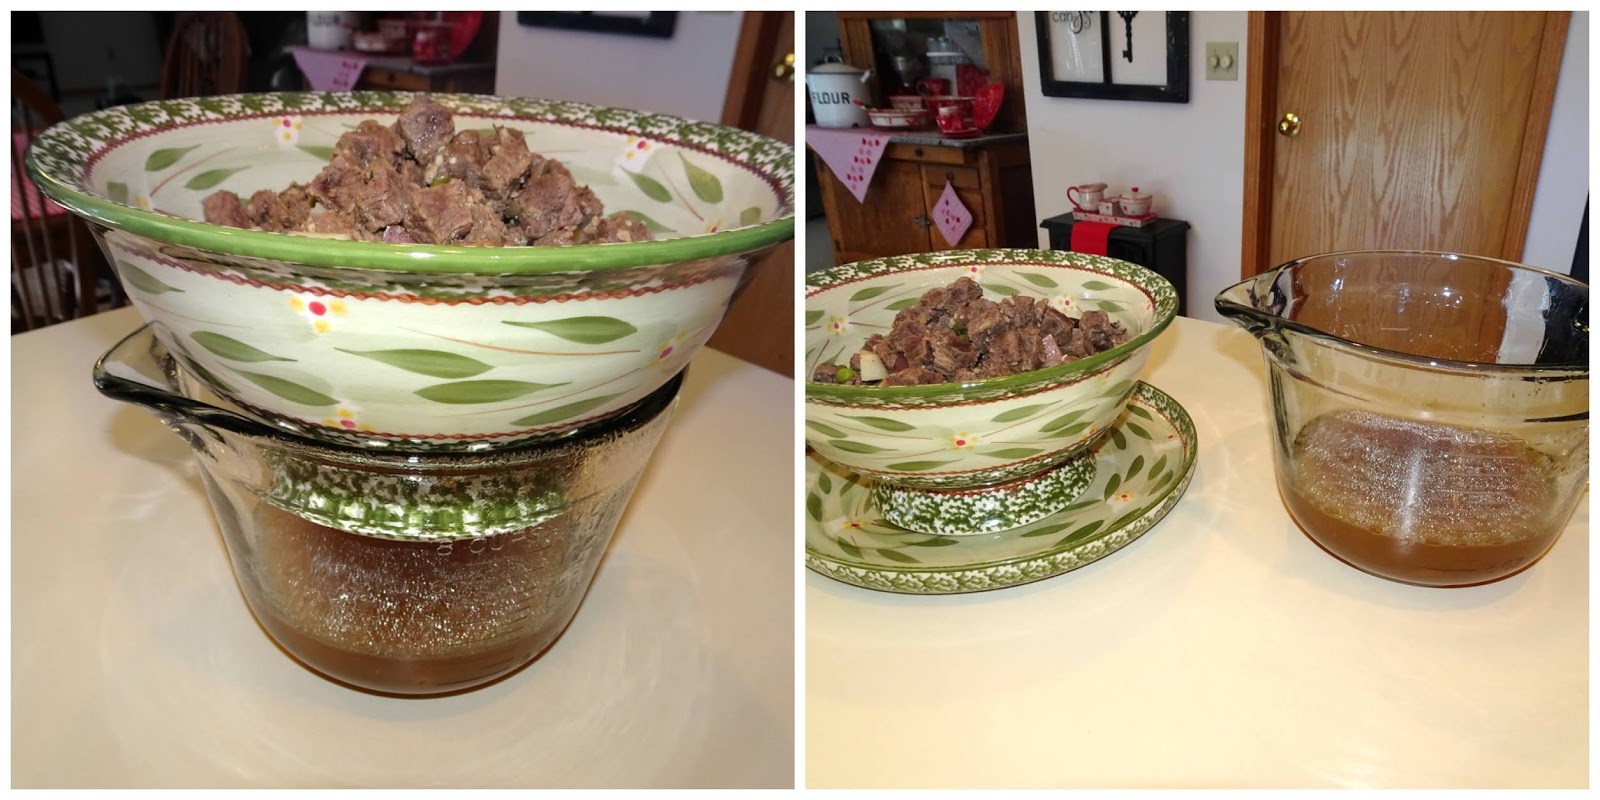
Place a large colander over a large bowl.  Remove the pressure cooker pot from the unit and pour the filling into the colander to separate the broth from the meat/vegetable mixture.  Once drained, place the colander of meat and vegetables on top of a plate to catch any remaining drippings.  Set aside.  Pour pot pie broth from bowl into a 4-cup measuring cup.  Add enough of the remaining 1 1/2 cups beef broth to the pot pie broth to equal 3 cups.

Place the pressure cooker pot back into the unit.  Pour the 3 cups of pot pie broth into the pressure cooker pot.  Select SAUTE.  Stir together the cornstarch and the milk until smooth.  Slowly add to the pot pie broth stirring constantly until the pot pie broth is like gravy--about 4-5 minutes.  Season with salt and pepper to taste.

Select CANCEL.  Remove the pressure cooker pot from the unit and set on a cooling rack to cool.

Preheat oven to 425 degrees.  Remove refrigerated pie crusts from box and allow to stand at room temperature for 15 minutes.  This time is important to allow the gravy to cool.  Gently unroll one crust, and place it in an ungreased 9-inch pie plate.  Press crust firmly against side and bottom.  If the pie plate is a traditional glass or aluminum pie plate, trim the crust along the pan edge.  If the pie plate is a deeper pie plate like Fiesta pie plates, press the crust against the side and bottom but do not trim--allow the crust to stand up along the rim of the pie plate.

Pour the desired amount of meat/vegetables onto the bottom crust.  If your pie plate is shallow, you may not use it all.  Pour the desired amount of pot pie gravy on top of the meat/vegetables.  My pie plate is deep, so I use all of the meat/vegetables and all of the gravy.  Place second crust over filling.  Wrap excess top crust under bottom crust edge.  Press edges together to seal; flute.  Cut slits in top crust.  Bake at 425 degrees for 30-35 minutes.  Allow to cool for 5 minutes; serve.

Click here for printable format


Pressure Cooker Beef Pot Pie 101:

Place a large colander over a large bowl.  Remove the pressure cooker pot from the unit and pour the filling into the colander to separate the broth from the meat/vegetable mixture.  Once drained, place the colander of meat and vegetables on top of a plate to catch any remaining drippings:


Pour pot pie broth from bowl into a 4-cup measuring cup.  Add enough of the remaining 1 1/2 cups beef broth to the pot pie broth to equal 3 cups.

Place the pressure cooker pot back into the unit.  Pour the 3 cups of pot pie broth into the pressure cooker pot.  Select SAUTE.  Stir together the cornstarch and the milk until smooth.  Slowly add to the pot pie broth stirring constantly until the pot pie broth is like gravy--about 4-5 minutes.  Season with salt and pepper to taste.

Select CANCEL.  Remove the pressure cooker pot from the unit and set on a cooling rack to cool:


Gently unroll one crust, and place it in an ungreased 9-inch pie plate.  Press crust firmly against side and bottom.  If the pie plate is a traditional glass or aluminum pie plate, trim the crust along the pan edge.  If the pie plate is a deeper pie plate like Fiesta pie plates, press the crust against the side and bottom but do not trim--allow the crust to stand up along the rim of the pie plate.

Pour the desired amount of meat/vegetables onto the bottom crust.  If your pie plate is shallow, you may not use it all.  Pour the desired amount of pot pie gravy on top of the meat/vegetables.  My pie plate is deep, so I use all of the meat/vegetables and all of the gravy:


Place second crust over filling.  Wrap excess top crust under bottom crust edge:


Press edges together to seal; flute.  (To see photos of how I flute pie crust, see this post:  http://www.easyaspiecanbe.com/2013/12/perfect-pie-crust-recipe-and-tutorial.html) Cut slits in top crust.  Bake at 425 degrees for 30-35 minutes.  Allow to cool for 5 minutes.  Enjoy!


Friday, December 20, 2019

Stabilized Whipped Cream


Need a whipped cream recipe that stays put?  This is the one!  Perfect for piping on pies, filling cupcakes, or frosting cakes, it will keep its shape for several days without drooping or becoming soft or runny.

16 ounces of cream is shown, but you will only need 8 ounces (1 cup).


Stabilized Whipped Cream

4 tsp. water
1 tsp. unflavored gelatin
1 cup heavy whipping cream
3 tbsp. granulated sugar
1/2 tsp. vanilla

Place a metal, glass, or ceramic 3- or 4-qt. mixing bowl and beaters into the freezer for 10 to 15 minutes. Add the water to a small microwave-safe bowl (like a custard cup), and sprinkle the gelatin on top.  Allow to rest for about 5 minutes.  Transfer the gelatin mixture to the microwave, and microwave until the gelatin is fully dissolved--about 10-15 seconds.  Stir the mixture; set aside to cool to room temperature.  

Add the whipping cream, granulated sugar, and vanilla to the mixing bowl, and with an electric mixer at medium-high speed, beat just until the cream starts to thicken and soft peaks form. Turn the mixer to low speed (very important). Slowly pour in the room-temperature gelatin mixture until well combined. Increase the mixer to medium speed (no higher) and continue mixing until stiff peaks form.

Pipe the whipped cream on your favorite dessert and refrigerate until ready to serve.


Notes:  

1)  I have a KitchenAid stand mixer, but I prefer to use a hand mixer for whipped cream and meringue.  I feel it gives more control over the end product.

2)  This whipped cream will hold up fine at room temperature for a couple of hours, but it's best to keep your dessert refrigerated and avoid leaving it anywhere too warm for too long.

3)  This recipe is best for piping on desserts, piping into cupcakes, or frosting cakes or cupcakes.  If you're wanting to mound piles of whipped cream on a dessert or pie, I suggest the following recipe as the texture is better suited for that purpose.  However, the whipped cream will only stay firm for several hours before starting to soften, and the dessert should be refrigerated the whole time.


A coconut cream pie topped with stabilized whipped cream.  


Friday, October 25, 2019

Hamburger Pie


One day, my friend Irene mentioned that she was making Hamburger Pie, so I asked her for the recipe.  It is so good and easily made with pantry ingredients.  I've made it more times than I can count.  Thanks, Irene! 


Hamburger Pie

1 lb. ground beef (85/15 or leaner)
1 1/3 cups instant mashed potato flakes
1 egg, beaten
1 tsp. salt
1/8 tsp. pepper
1 tbsp. dried minced onion
1/4 cup ketchup
1 cup milk
4 servings of prepared instant mashed potatoes
Shredded cheddar cheese
1 packet brown gravy mix

Heat oven to 350 degrees.  Mix ground beef, instant mashed potato flakes, egg, salt,  pepper, dried minced onion, ketchup, and milk.  Pat into an ungreased pie plate.  Bake uncovered for 35-40 minutes.  5 minutes before the meat mixture is done, prepare 4 servings of instant mashed potatoes according to package instructions.  Top pie with prepared mashed potatoes and sprinkle with cheese.  Bake 3-4 minutes or until cheese melts.  While cheese is melting, prepare the brown gravy mix according to package instructions.   Top each slice of pie with desired amount of gravy.


This recipe was shared with me by my friend Irene who received it from her friend Mary.  

Friday, June 7, 2019

Catch-a-Husband Blackberry Cobbler


The creator of Catch-a-Husband Blackberry Cobbler, Francine Bryson, says it's what got her a husband, so how could you not want to try this adaptation?  If you're not married, this may just be the ticket.  And if you are married, your husband may propose again. ♥


Catch-a-Husband Blackberry Cobbler

4 tbsp. (1/2 stick) butter, melted
1 1/2 cups baking mix (like Bisquick) 
2/3 cup sugar
2/3 cup whole milk
1 (21 oz.) can blackberry pie filling
1 tbsp. packed light brown sugar
1/2 tsp. sugar

Preheat the oven to 325 degrees.  Pour the melted butter into an 8x8 square baker.  In a 1.5 qt. bowl, stir together the baking mix, sugar, and milk until smooth.  Pour into the baker on top of the butter.  Drop spoonfuls of the pie filling over the batter.  Do not stir.  Sprinkle the brown sugar over the top of the cobbler.  Bake for about an hour or until it's golden brown on top.  Sprinkle 1/2 tsp. of sugar over the cobbler 10 minutes before it’s done.  Serve warm with ice cream.


Fruit cobbler gets its name from the crispy, buttery crust that is formed when baking, which then resembles cobblestone streets common to old villages.  In this recipe, the pie filling will sink to the bottom allowing a beautiful crust to develop on top.


Friday, May 3, 2019

Coconut Cream Candy Bar Pie


Coconut Cream Candy Bar Pie is like a pie and candy bar combined.  No-bake and quick to make with only 265 calories per slice, you can indulge any time!  Full fat/sugar ingredients can be substituted if desired, and it will be just as delicious!


Coconut Cream Candy Bar Pie

Marlene Koch is known for her healthy, tasty recipes.  This pie recipe is no exception and can be found here:  http://marlenekoch.com/15-minute-coconut-cream-candy-bar-pie/

Notes:

*It's easier to toast the coconut evenly by toasting it in the oven.  Preheat the oven to 325 degrees.  Spread coconut on a baking sheet and bake until light brown (about 10-15 minutes).  Stir every two - three minutes.  Let cool slightly.

*I use regular hot fudge topping instead of the sugar-free chocolate ice cream topping called for in the recipe.  When it's time to add it, remove the lid from the hot fudge topping and microwave according to label directions.  Drizzle fudge sauce over pie and follow the rest of the recipe directions.

*I make my own crust following this delicious recipe!


 Baking Tip for Easily Removing a Piece of Crumb-Crust Pie:  Just before serving, rub the outside of the filled pie plate with a warm, damp towel.  This softens the butter in the crust, making it less likely to stick to the pie plate.  To prepare the towel, rinse it in very hot water, then wring it well.

Click here to print!


Friday, August 24, 2018

No-Bake Banana Caramel Cream Cheese Pie


This delightful pie has a crunchy graham cracker crust, bananas, cheesecake-type filling, caramel, and is topped with a sprinkling of pecans.  No one will guess that it has only 322 calories* per slice.  If you prefer, you can make it with full fat ingredients and sugar.  It will still be fantastic!

Pecans not pictured.

No-Bake Banana Caramel Cream Cheese Pie

Marlene Koch is known for her healthy, tasty recipes.  This pie recipe is no exception and can be found here:  http://marlenekoch.com/no-bake-banana-caramel-cream-cheese-pie/

Notes:

*I make my own graham cracker crust using this recipe:    http://easyaspiecanbe.blogspot.com/2014/05/graham-cracker-crust-and-tutorial.html

*I substitute 4 ounces (half of an 8 oz. block) Neufchatel cream cheese, softened, for the cream cheeses listed in the recipe.

*I add 2 tablespoons caramel ice cream topping to the top as well as 1 tablespoon chopped pecans. 

*Pie has 322 calories per slice when made as directed using my graham cracker crust recipe.

Click here to print!


Friday, August 12, 2016

Lemon Meringue Pie and Tutorial (Part 1)


Fresh lemon juice and lemon zest make this lemon meringue pie filling tangy and appealing. And when it's poured into a waiting crust and covered with mounds of meringue and baked...it is heavenly.

3 eggs are pictured, but one more egg white will be needed for the meringue, so you need a total of 4 eggs.

Lemon Meringue Pie

1 (9") baked pie shell

Filling:
1 1/2 cups sugar
3 tbsp. cornstarch
3 tbsp. flour
Dash of salt
1 1/2 cups water
3 egg yolks (use large eggs)
2 tbsp. butter
1/2 tsp. finely shredded lemon peel
1/3 cup lemon juice

Meringue:
1/3 cup water
1 tbsp. cornstarch
4 egg whites (use large eggs)
1/2 tsp. vanilla
1/2 cup sugar (superfine sugar will give better results)
1/2 tsp. cream of tartar

From the meringue portion of the ingredient list:  In a small saucepan, combine the water and cornstarch.  Cook over medium heat until thick, translucent, and boiling, stirring constantly.  Remove from heat, and pour mixture into a small bowl to cool.
 
From the filling portion of the ingredient list:  Separate egg yolks from whites.  Crack an additional egg and separate the yolk from the white discarding the yolk so that you have a total of four egg whites for the meringue and three egg yolks for the filling.  Refrigerate yolks, and set whites aside to warm to room temperature for 30 minutes.

Measure out the rest of the ingredients for the meringue and the pie. (See photos in tutorial.)

 Prepare filling:  Preheat oven to 325 degrees.  In a medium (3 qt.) saucepan, combine the sugar, cornstarch, flour, and dash of salt.  Gradually stir in water.  Cook and stir over medium-high heat till thickened and bubbly.  Reduce heat; cook and stir 2 minutes more.  Remove from heat.

Beat egg yolks slightly.  Gradually stir about 1 cup of the hot mixture into the beaten yolks.  Return mixture to saucepan; bring to a gentle boil.  Cook and stir 2 minutes more.  Remove from heat.  Stir in butter and lemon peel.  Gradually stir in lemon juice, mixing well.  Place a piece of plastic wrap on top of filling to prevent a skin from forming.  Set aside.

 Prepare meringue:  In a small bowl, combine the sugar and cream of tartar.  Mix well and set aside.  Whisk the cornstarch mixture (that was prepared earlier) and set aside.  Place the egg whites and vanilla into a scrupulously clean glass or ceramic large mixing bowl.  (I use a 4 qt. bowl.)  With an electric mixer, begin beating slowly until mixture begins to foam; then increase speed to high, and begin gradually adding the sugar mixture one tablespoon at a time until all the sugar is added.  Beat until soft peaks form.  This can take some time.  Decrease the speed to medium; add half of the cornstarch mixture, mixing well.  Repeat with the other half.  Increase the speed to high and beat until stiff peaks form.  Set aside.

Assemble pie:  Remove plastic wrap from the filling and reheat it on medium until it starts boiling again. Whisk it as it boils for about five seconds then pour it into the shell.

Immediately spread the meringue over the filling.  Put a large part of it (about half) in the middle of the pie so that it can start cooking from the underneath, and spread the meringue toward the outside adding more to the perimeter as needed.  Make sure you get it over the crust edges (so it won’t pull away as it bakes).  Add remaining meringue to the center creating a nice, high mound.  Using the back of your spoon, push into the meringue while pulling up to make decorative peaks.  

Bake in a 325 degree oven for 20 to 30 minutes until the meringue is lightly browned.  Cool the pie away from drafts on a wire rack at room temperature for 1 hour.  Refrigerate uncovered for at least 3 hours before cutting and serving. Pie is best made and served on the same day.  Store leftovers loosely tented with aluminum foil in the refrigerator. 

Click here for printable format 

Perfect Pie Crust:  http://easyaspiecanbe.blogspot.com/2013/12/perfect-pie-crust-recipe-and-tutorial.html

Lemon Meringue Pie 101:

From the meringue portion of the ingredient list:  In a small saucepan, combine the water and cornstarch.  Cook over medium heat until thick, translucent, and boiling, stirring constantly.  Remove from heat, and pour mixture into a small bowl to cool:


From the filling portion of the ingredient list:  Separate egg yolks from whites.  Crack an additional egg and separate the yolk from the white discarding the yolk so that you have a total of four egg whites for the meringue and three egg yolks for the filling.  Refrigerate yolks, and set whites aside to warm to room temperature for 30 minutes:


 Measure out the rest of the ingredients for the meringue and the pie:


 Prepare filling:  Preheat oven to 325 degrees.  In a medium (3 qt.) saucepan, combine the sugar, cornstarch, flour, and dash of salt.  Gradually stir in water.  Cook and stir over medium-high heat till thickened and bubbly.  Reduce heat; cook and stir 2 minutes more.  Remove from heat:


 Beat egg yolks slightly.  Gradually stir about 1 cup of the hot mixture into the beaten yolks.  Return mixture to saucepan; bring to a gentle boil.  Cook and stir 2 minutes more.  Remove from heat.  Stir in butter and lemon peel:


 Gradually stir in lemon juice, mixing well.  Place a piece of plastic wrap on top of filling to prevent a skin from forming.  Set aside:


  Prepare meringue:  In a small bowl, combine the sugar and cream of tartar.  I like to use superfine sugar (pictured here) as it dissolves quicker making your meringue less likely to bead and/or weep.  Mix well.  Place the egg whites and vanilla into a scrupulously clean glass or ceramic large mixing bowl.  (I use a 4 qt. bowl.)  With an electric mixer, begin beating slowly until mixture begins to foam:


Increase speed to high, and begin gradually adding the sugar mixture one tablespoon at a time until all the sugar is added.  Beat until soft peaks form.  This can take some time.  The tips will curl over when this stage is reached:


Decrease the speed to medium; add half of the cornstarch mixture (that was prepared earlier), mixing well.  Repeat with the other half.  Increase the speed to high and beat until stiff peaks form.  They will be firm, rigid, and glossy.  Set aside:


Assemble pie:  Remove plastic wrap from the filling and reheat it on medium until it starts boiling again. Whisk it as it boils for about five seconds then pour it into the shell.

Immediately spread the meringue over the filling.  Put a large part of it (about half) in the middle of the pie so that it can start cooking from the underneath, and spread the meringue toward the outside adding more to the perimeter as needed:


Lemon Meringue Pie and Tutorial (Part 2)


Lemon Meringue Pie 101 (Part 2):

Make sure you get the meringue over the crust edges (so it won’t pull away as it bakes).  I forgot to take a photo of the edge before I baked the pie, but here is a photo of the edge after it baked.  You can see that I spread the meringue to the top of the fluting:


Add remaining meringue to the center creating a nice, high mound.  Using the back of your spoon, push into the meringue while pulling up to make decorative peaks:


Bake in a 325 degree oven for 20 to 30 minutes until the meringue is lightly browned.  Cool the pie away from drafts on a wire rack at room temperature for 1 hour.  Refrigerate uncovered for at least 3 hours before cutting and serving. Pie is best made and served on the same day.


I've made many lemon meringue pies over the years experimenting with different techniques, as this pie can be a little fussy according to the weather (best made on a day with lower humidity), heat of the filling, meringue stabilizer, and so forth. And for every expert who says to make it one way (hot filling, French meringue), there is another expert saying to make it a different way (cold filling, Italian meringue).  This recipe is a compilation of all the techniques I have found to be the best, and I know they will work for you, too. 

Here is a photo of the interior of the pie 3.5 hours after it baked (would have been even firmer at the recommended 4-hour mark) and also a close-up photo of the meringue edge where you can see that the meringue did not shrink away from the crust nor develop beading.


Enjoy!  :)


Wednesday, June 22, 2016

Double Berry Custard Pie


What a cool and refreshing way to use summer berries!  Double Berry Custard Pie is a no-bake pie with only 6 ingredients...how easy is that?  


Double Berry Custard Pie

Allrecipes is known for its magazine, website, and apps.  It is a great source for a variety of mouthwatering recipes including Double Berry Custard Pie:  http://allrecipes.com/recipe/247242/double-berry-custard-pie/

Notes:

*I have an easy, foolproof graham cracker crust recipe here: http://easyaspiecanbe.blogspot.com/2014/05/graham-cracker-crust-and-tutorial.html

*Baking Tip for Easily Removing a Piece of Crumb-Crust Pie:  Just before serving, rub the outside of the filled pie plate with a warm, damp towel.  This softens the butter in the crust, making it less likely to stick to the pie plate.  To prepare the towel, rinse it in very hot water, then wring it well. 

Click here to print!

I was very honored to have this photo selected by David Venable of QVC for FoodieFoto of the week on June 22, 2016.


Friday, February 26, 2016

Banana Cream Pie


With its bananas and velvety custard, this banana cream pie is full of old-fashioned flavor.

A 16 oz. carton of whipping cream is pictured, but only an 8 oz. carton is needed if making your own whipped cream.

Banana Cream Pie

1 cup sugar
1/4 cup cornstarch
1/4 tsp. salt
3 cups whole milk
4 egg yolks, beaten
3 tbsp. butter
1 1/2 tsp. vanilla
1 (9") baked pie shell 
medium firm bananas (3 medium-sized or 2 large)
whipped cream and additional sliced bananas

In a medium (3 qt.) saucepan, combine sugar, cornstarch and salt. Gradually stir in milk. Cook and stir over medium heat till thickened and bubbly. Reduce heat; cook and stir 2 minutes more. Remove from heat. Gradually stir 1 cup of the hot mixture into the yolks. Return egg mixture to saucepan; bring to a gentle boil. Cook and stir for 2 minutes more. Remove from heat, and stir in the butter and vanilla. Press plastic wrap onto surface of filling; refrigerate 30 minutes.

After the filling has chilled for 30 minutes, slice bananas and arrange in pastry shell.  Stir filling and then pour over bananas. Refrigerate for several hours (about 4).  Before serving, garnish with whipped cream and banana slices.

Click here for printable format 

Perfect Pie Crust:  http://easyaspiecanbe.blogspot.com/2013/12/perfect-pie-crust-recipe-and-tutorial.html  

Whipped Cream:  http://easyaspiecanbe.blogspot.com/2013/12/whipped-cream-recipe-and-tutorial.html