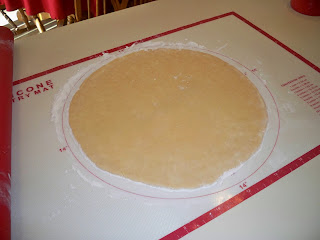
The best pie crust recipe on the planet is The Pioneer Woman Cooks Perfect Pie Crust. Once you make it, you will make no other. It is flaky, tender, and has a wonderful taste. You make the dough ahead of time, and then freeze it, so it is ready when you are.
Click here for the recipe link and a wonderful tutorial
I divide Ree Drummond's recipe into halves, so I will have generous pie crusts. I freeze them for at least 24 hours before rolling them out. When I'm ready to use a crust, I remove one from the freezer and allow it to sit on the counter to thaw slightly...about 20 minutes. Then I remove it from the bag and get started! Here is my work station with everything ready to go: a spatula, pastry mat, rolling pin, water, flour, pie plate, and pie crust. If you don't have a pastry mat, just use your counter top! :)
Here is the amount of flour I put on the mat:
And here is the amount of flour I put on the dough:
Roll the dough from the center outward. It will split in places, and when it does, you just cup your hand around the outside edges, and push it back together:
Once it's slightly bigger than its original size, move it to the side with your spatula, lightly flour the area where the dough was, and flip the dough over onto the newly floured area. Add a dusting of flour to the top side, spread it over the dough with your hand, and continue rolling from the center outward. Keep the dough circular by occasionally pushing the edge in gently with sides of hands:
Roll the dough 2-3 inches larger than your inverted pie plate:
With the spatula, loosen the pie crust edges all the way around:
Using both hands, lift the crust and fit it into the pie plate:
It might tear in places. If it does, after it's in the plate, moisten the tear edges with water and press together. Put some flour on top of the tear to absorb the water. You can see several tears in this crust I had to fix:
Trim overhanging edge of dough 1 inch from rim of plate. Tuck the excess dough under itself above the rim:
Finish the edges as desired. I like to flute the edges. I place my index finger outside the pastry edge and knuckles on the inside. I pinch the pastry in a rounded V shape. I had to take the photos separately since I was the only photographer available. :)
After fluting, press the sides of the pie shell firmly against the sides and lower rim of the pie plate. You can see in the photo below where I've pressed the dough against the lower rim of the Fiesta pie plate. For a pre-baked crust, prick the crust all over with a fork, turn the oven on 400 degrees, and place the pie crust in the refrigerator for the dough to relax while the oven is heating. This will reduce shrinkage.
Place the crust in the oven when it reaches 400 degrees. Watch the crust. If it starts to puff up in the middle, just poke it with a fork. Here is my crust puffing up:
The crust will be done when it is lightly browned...about 20-25 minutes. Allow to cool, and then fill, or store it until the next day in an airtight container.
Pastry for Single-Crust Pie Baked with Filling: Do not prick pastry. Bake as directed in individual recipe.
Pastry for Double-Crust Pie: Roll out dough as described above, and fit into pie plate. Do not prick pastry. Trim pastry even with rim. For top crust, roll out a second crust, place desired pie filling into pie shell, top with pastry for top crust, and trim top crust 1/2 inch beyond edge of pie plate. Fold extra pastry under bottom crust; flute edge. Cut slits for escape of steam. Bake as directed in individual recipe.


Great tutorial!
ReplyDeleteThank you! :)
Delete