Friday, December 26, 2014

Feta Cheese Ball


 Feta, cream cheese, and bacon blend together to create a savory twist on a classic.  Feta Cheese Ball is perfect to serve for any occasion.


Feta Cheese Ball

2 (8 oz.) packages cream cheese, softened
1/2 cup crumbled feta cheese
2 tsp. ranch salad dressing and seasoning mix
1/4 cup grated Parmesan cheese
1/4 cup crumbled, cooked bacon (4-5 strips)
1 tsp. dill weed
Club crackers

In a large bowl on medium speed, beat cream cheese until fluffy.  Beat in feta cheese and dressing mix.  Put into freezer until slightly firm--about 15 minutes.  While mixture is chilling, combine the Parmesan cheese, bacon, and dill weed in a small bowl.  After cheese mixture has chilled for 15 minutes, shape into a ball, and roll cheese ball in Parmesan mixture.  Cover with plastic wrap and refrigerate for at least 1 hour or until firm.  Serve with crackers. 


Friday, December 19, 2014

Cherry Cheese Pie


Cherry Cheese Pie is a simple, easy, delicious pie.  It is a family favorite and perfect for Christmas, Valentine's Day, the Fourth of July...anytime!


Cherry Cheese Pie

1 (8 oz.) package cream cheese, softened
1 (14 oz.) can sweetened condensed milk
1/3 cup lemon juice
1 tsp. vanilla
1 (21 oz.) can cherry or blueberry pie filling, chilled
1  9-inch graham cracker crust

In a large mixer bowl, beat cream cheese on medium speed until fluffy.  Beat in sweetened condensed milk a little at a time until smooth.  Beat in lemon juice and vanilla.  Pour into the crust and chill 3 hours or until set.  Top with desired amount of pie filling before serving.  Keep refrigerated. 


Mini pies can be made using 4 (9 or 10 oz.) ramekins.  Use 1/4 of the graham cracker crust mixture for each mini pie. Pat in bottom and up sides, and bake as directed until crusts are lightly browned.   Cool, and then continue with the Cherry Cheese Pie recipe dividing filling evenly into each ramekin and topping with desired pie filling:


Saturday, December 13, 2014

Peppermint Candy Ice Cream Pie


Peppermint Candy Ice Cream Pie is delicious, has few ingredients, can be made ahead of time, and the best part...is so easy!  What a beautiful dessert for your holiday table!


Peppermint Candy Ice Cream Pie

1 pint vanilla ice cream
1 (8 oz.) container frozen whipped topping, partially thawed
12 peppermint candies, crushed
3 drops red food coloring
1 9-inch Oreo cookie crust
Garnish:  1 (8 oz.) container frozen whipped topping, thawed
                chopped peppermint candies 

Combine ice cream, half of partially thawed whipped topping (4 oz.), and crushed candies.  Stir in red food coloring.  Spoon mixture into prepared pie crust; cover and freeze 4 hours.  Garnish with desired amount of thawed whipped topping and chopped peppermint candies.  Serve immediately or freeze until ready to serve.  Store in freezer.

Click here for printable format 

Oreo Cookie Crust:   http://easyaspiecanbe.blogspot.com/2014/12/oreo-cookie-crust.html


Friday, December 12, 2014

Oreo Cookie Crust


You know that any pie recipe that calls for an Oreo crust is going to be good.  You can make one almost as cheaply as you can buy one, plus a homemade crust is so much better (and prettier!) than one bought from a store.  And don't forget the added bonus of getting to eat an Oreo or two while making it.


Oreo Cookie Crust

18 Oreo cookies, finely crushed
3 tbsp. butter, melted

Finely crush Oreos (I use my food processor), and mix with melted butter. Press crumb mixture onto bottom and sides of a 9-inch pie plate sprayed with cooking spray. Refrigerate until ready to fill.  

Click here for printable format 

 Baking Tip for Easily Removing a Piece of Crumb-Crust PieJust before serving, rub the outside of the filled pie plate with a warm, damp towel.  This softens the butter in the crust, making it less likely to stick to the pie plate.  To prepare the towel, rinse it in very hot water, then wring it well.


Friday, December 5, 2014

Microwave Peanut Brittle Recipe and Tutorial


Microwave Peanut Brittle is crunchy, buttery, and tastes wonderfully of roasted peanuts.  It's so easy; you don't even need a candy thermometer.  Be prepared for it to be requested every holiday season.


Microwave Peanut Brittle

1 cup sugar
1/2 cup light corn syrup
1/8 tsp. salt
1 1/2 cups shelled raw peanuts
1 tbsp. butter
1 1/2 tsp. baking soda
1 teaspoon vanilla

Grease baking sheet heavily with butter (additional butter...not the butter used in the recipe).  Combine sugar, corn syrup, and salt in a 2.5 quart microwave-safe (glass or Pyrex) mixing bowl.  Stir in peanuts.  Microwave at HIGH (100%) until light brown approximately 7-9 minutes.  With a wooden spoon, stir once or twice during cooking.

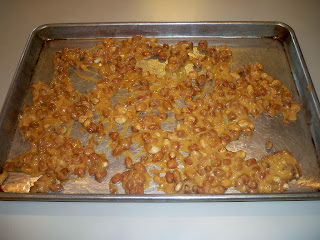
Stir in remaining ingredients until light and foamy (will only take a few seconds).  Quickly spread on buttered baking sheet.  Spread as thinly as possible.  Cool; break into pieces.

Click here for printable format 

Microwave Peanut Brittle 101:

Give this recipe a trial run before making it for others to gauge how quickly your microwave will cook the mixture as microwave ovens vary. I have a new microwave (1000 watts), and it takes 8 minutes.  If your microwave's wattage is the same as mine, try 8 minutes for your first batch.  If it has a higher wattage, cook for less time, and if it has a lower wattage, cook for more time.  If, after the candy completely cools, it is a bit chewy and/or pale, you'll know you need to microwave it a bit longer next time.  If it tastes like it cooked too long, you'll know to scale back the time.  If it's only slightly under- or overcooked, increase or decrease your time by 10 seconds.  This peanut brittle will stay fresh in a zippered storage bag for several weeks.

 I use a sandwich bag to spread the butter on the baking sheet.  I cover the entire bottom of the sheet with butter:


Measure all ingredients before starting:


Mix the sugar, corn syrup, and salt with a wooden spoon because of the candy's eventual high temperature.  For the same reason, use a microwave-safe mixing bowl that can withstand the high temperature.  Glass or Pyrex bowls work well. The mixture will be very thick and difficult to mix.  Stir in the peanuts:


Microwave at HIGH (100%) until light brown approximately 7-9 minutes.  With a wooden spoon, stir twice during cooking.  Here is the mixture at the first and second stirs:


Stir in remaining ingredients until light and foamy (will only take a few seconds):


 Quickly spread on buttered baking sheet with two metal spoons.  They work much better than wooden spoons for this purpose.  Spread as thinly as possible.  Mixture will continue to look foamy until it starts to harden.  Don't worry about getting every smidgen of candy out of the bowl and onto the baking sheet. The most important thing is getting the candy spread quickly before it starts to harden.


Soak the bowl and spoons in the hottest tap water you have.  The candy stuck to the bowl will eventually dissolve:


Cool and break into pieces.  If needed, I use a metal spatula to loosen sections.  Enjoy!