Friday, October 4, 2019

Air Fryer Dilled Salmon Patties


Want crispy, hot, savory salmon patties without the mess of pan frying with oil?  Use your air fryer!  
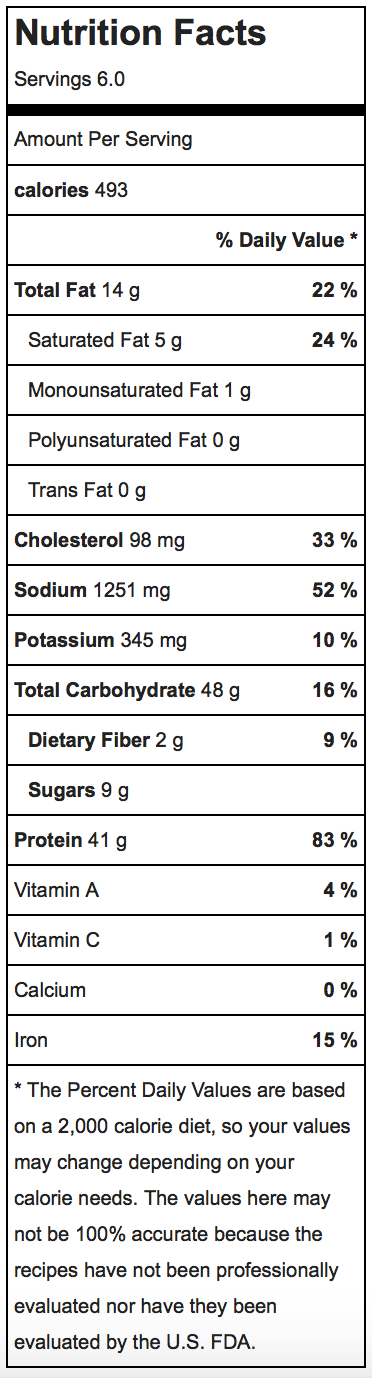
Onion not shown.

Air Fryer Dilled Salmon Patties

1 (14.75 oz.) can salmon
2 tbsp. butter
1/2 cup chopped onion
1/2 cup fine dry bread crumbs plus additional crumbs for coating
2 eggs, beaten
1 tsp. dried dill weed
1/2 tsp. dried mustard
1/4 tsp. salt
1/4 tsp. pepper

Drain salmon.  Discard bones and skin from salmon; flake meat.  In a 5 qt. saute pan or Dutch oven, melt butter over medium heat and cook onion in butter until tender but not brown.  Remove from heat.  Add 1/2 cup bread crumbs, beaten eggs, dill weed, dried mustard, salt, pepper, and flaked salmon; mix well.  Shape into 4 patties and place on a baking sheet.  Patties will be very loose.  If they start to fall apart, just reshape.  Add a generous amount of fine dry bread crumbs to a shallow bowl like a pie plate.  Coat patties on all sides and place back on the baking sheet.

Spray the bottom of your air fryer basket with oil to prevent the patties from sticking.  Place 2-4 patties (quantity depends on the diameter of your air fryer basket) in the basket and spray the tops with oil.  Set temperature to 400 degrees and air fry for 6-10 minutes until desired brownness. Turn patties, spray tops with oil, and air fry for 5-6 minutes more.  Serve with Lemon Sauce (recipe link below) for a mouth-watering main dish.

Click here for printable format

I highly recommend serving the salmon patties with this recipe for Lemon Sauce:  http://www.easyaspiecanbe.com/2019/10/lemon-sauce.html

Thursday, October 3, 2019

Lemon Sauce


Lemon Sauce is a light, delicious sauce for any type of fish especially salmon patties!


Lemon Sauce

Taste of Home has been around for a long time, and there's a reason why!  All the recipes are tested in a test kitchen and feature common ingredients found in most grocery stores.  You can find the Lemon Sauce recipe as part of the Lemony Salmon Patties recipe on the Taste of Home website:  https://www.tasteofhome.com/recipes/lemony-salmon-patties/?cpi=16  

Wednesday, September 25, 2019

Perfect Pressure Cooker Brown Rice


Brown rice comes out perfectly in the pressure cooker.  Just set it and forget it!

Butter not shown.

Perfect Pressure Cooker Brown Rice

Yield:  6 cups
Approximate Total Time:  55 minutes 
Electric Pressure Cooker Size:  6 quarts

2 cups long grain brown rice
2 1/2 cups water
1 tsp. Kosher salt*
1 Tbsp. butter*

Measure rice into a 2-qt. bowl and cover with cold water.  Swish with your fingers to remove starch.  Drain, and continue rinsing the rice using this process until the water is clear.  Drain. Place all ingredients into the pressure cooker pot; stir.  Lock the pressure cooker lid in place and set steam vent to Sealing. Select PRESSURE COOK (Manual) and cook for 24 minutes on High pressure.  Once the 24-minute cooking cycle is complete, select CANCEL or unplug the unit. (This will turn off the pressure cooker as any extra heat can cause the rice to stick.) Allow the pressure to release naturally, which will take about 15 minutes. Remove lid, fluff with fork, and serve.

*Salt and butter are optional or can be adjusted as desired.

Note: Use a standard dry measuring cup for the rice and a glass liquid measuring cup for the water.

Friday, September 20, 2019

Crock Pot Chicken and Dumplings and Tutorial


Comfort food perfection!  Thick, chewy dumplings, tender chicken, and a full-flavored, rich broth are only a slow cooker meal away.  

Celery is called for in the recipe, but I don't use it.

Crock Pot Chicken and Dumplings

Brandie of The Country Cook has many delicious, easy recipes.  The recipe and video for Crock Pot Chicken and Dumplings can be found on Brandie's website The Country Cook:   https://www.thecountrycook.net/crock-pot-chicken-and-dumplings/ 

Crock Pot Chicken and Dumplings 101:

1)  I do not recommend frozen breasts for this recipe.  The USDA recommends using thawed meat in a slow cooker because of the potential hazard of bacteria growing.  https://www.realsimple.com/food-recipes/cooking-tips-techniques/usda-frozen-meat-poultry-slow-cooker

2)  I use 1 tsp. of garlic salt, 1/4 tsp. pepper, and Pillsbury Grands Southern Recipe Southern Homestyle Biscuits.

3)  I recommend a longer cooking time of 6-8 hours on low or until chicken reaches 165 degrees. 

4)  If needed, salt to taste before serving.

Click here to print!

Photos of process:  Flatten each biscuit with the palm of your hand. Cut the biscuits into strips, and then cut down the center:


Put the flour into a bowl, place slices of biscuits into the flour, and toss to coat well:


Drop the coated biscuit slices one by one into the slow cooker. Doing this one at a time will keep them from sticking together when you drop them in, and the flour will thicken the broth. Take a spoon and gently push the biscuits down under the broth so the tops are moistened. Do NOT stir:


Enjoy!


Thursday, September 19, 2019

Pressure Cooker Long Grain White Rice


Long grain white rice is SO easy in the pressure cooker!  And you can easily adjust the firmness to your preference!


Pressure Cooker Long Grain White Rice

Yield:  6 cups
Approximate Total Time:  35 minutes 
Electric Pressure Cooker Size:  6 quarts

2 cups long grain white rice
2 1/4 cups water
1 tsp. salt*
1 tbsp. butter*

Measure rice into a 2-qt. bowl and cover with cold water.  Swish with your fingers to remove starch.  Drain, and continue rinsing the rice using this process until the water is clear.  Drain.  Combine all ingredients in the pressure cooker pot.  Lock the pressure cooker lid in place and set steam vent to Sealing. Select the RICE button and adjust (if needed) so it's on the "Normal" setting. If your pressure cooker does not have a rice button, select PRESSURE COOK (Manual) and cook for 12 minutes on LOW pressure.  

Once the 12-minute cooking cycle is complete, select CANCEL or unplug the unit. (This will turn off the pressure cooker as any extra heat can cause the rice to stick.) Allow the pressure to release naturally, which will take about 6 minutes. Remove lid, fluff with fork, and serve.

*Salt and butter are optional or can be adjusted as desired.

Note: Use a standard dry measuring cup for the rice and a glass liquid measuring cup for the water.

Rice firmness:

*Al Dente (firmer) texture: Decrease water to 2 cups. Everything else will stay the same. This will yield about 5 cups of rice.

*Softer texture: Increase water to 2 1/2 cups. Everything else will stay the same. This will yield about 6 cups of rice.

Click here for printable format

Friday, September 13, 2019

Easy Long Grain Rice


Want perfect long grain rice every time?  Use your microwave!

1 1/2 cups water shown for a firmer rice texture.


Easy Long Grain Rice

1 cup uncooked long grain rice
1 3/4 cups hot water**
1/2 tsp. salt*
1 Tbsp. butter*

Measure rice into a 2-qt. bowl and cover with cold water.  Swish with your fingers to remove starch.  Drain, and continue rinsing the rice using this process until the water is clear.  Drain.  Combine all ingredients in the 2-qt. bowl.  Cover with plastic wrap and vent by turning back one edge at the side of the bowl to form a narrow slot where excess steam can escape.  Microwave at High (100%) for 5 minutes.  Reduce power to Medium (50%).  Microwave until liquid is absorbed and rice is tender, 10-13 minutes.  Fluff with fork before serving.
Yield:  about 3 cups cooked rice

*Salt and butter are optional or can be adjusted as desired.

**Rice firmness:

Al Dente (firmer) texture: Decrease water to 1 1/2 cups. Everything else will stay the same.


Friday, September 6, 2019

Pressure Cooker Egg Bites


Everyone is raving about the Sous Vide Egg Bites available at Starbucks.  At almost $5 for two, did you know you can make several for a fraction of the cost using your pressure cooker?  Yup, and you can use whatever ingredients you want!


Pressure Cooker Egg Bites

Yield:  7 but varies depending on ingredient quantities
Approximate Total Time:  45 minutes

Ruth "Rootitoot" McCusker created this recipe so that it is perfect for everyone including beginners. You can find the recipe on Ruth's website:  https://rootitoot.com/recipes-and-cooking/breakfast-breads-and-sandwiches/egg-bites/

Egg Bites 101:

*I use a 6-qt. pressure cooker.

*I used pre-shredded extra sharp cheddar cheese and packaged real bacon bits in the version pictured, and they couldn't have been yummier--or easier!

*Egg bite molds can be purchased several places like Amazon, Kohl's, etc.  I got mine at Kohl's:  https://www.kohls.com/product/prd-3369230/food-network-pressure-cooker-accessory-silicone-egg-bites-with-lid.jsp?prdPV=1

*Once the pressure cooker lid is removed, allow egg bites to rest for 1-2 minutes to settle.  Then remove from pressure cooker, flip onto a plate, and let rest for 5-10 minutes so moisture can evaporate.

*Recipe can be doubled and two egg bite molds can be used:

Two egg bite molds before cooking.
Egg bites right after lid is removed.

Friday, August 23, 2019

Chicken & Rice for Dogs and Tutorial


A bland diet of chicken and rice is sometimes prescribed for dogs when they have upset stomachs.  The easiest, most perfect way to make both at the same time is in the pressure cooker.


Chicken & Rice for Dogs

Yield:  varies
Approximate Total Time:  1 hour
Electric Pressure Cooker Size:  6 quarts

2-4 boneless, skinless chicken breasts, fresh or frozen
1 cup uncooked long grain rice, rinsed*
1 cup water*

Pour 1.5 cups of water into the pressure cooker pot. Place the desired amount of chicken breasts into the pot. They can be fresh or frozen but need to be placed in one layer. Place a trivet over the top of the chicken. Ideally, the legs of the trivet should rest on the pot, not on top of the chicken, so shimmy it around until it feels right.

In a 1.5 qt. heatproof bowl**, combine 1 cup rinsed white rice with 1 cup water. It's very important to rinse the rice to reduce stickiness. Place the bowl on top of the trivet.  Lock the pressure cooker lid in place and set steam vent to Sealing. Select PRESSURE COOK (Manual) and cook for 22 minutes on High pressure.  Once the 22-minute cooking cycle is complete, allow the pressure to release naturally.

Remove lid.  Remove bowl of rice and fluff with a fork.  Remove chicken from pot and shred. Once cooled, serve according to the ratio and frequency recommended by your veterinarian.

Click here for printable format

*If more rice is desired, increase the rinsed rice to two cups and the water to two cups.  No change in time or size of bowl is needed.

**Because of the high pressure, I recommend a stainless steel bowl for PIP (pot-in-pot) cooking.  This is the one I use:  https://www.amazon.com/Tovolo-Stainless-Steel-Mixing-Quart/dp/B001C0B02E/ref=sr_1_3?ie=UTF8&qid=1539612149&sr=8-3&keywords=1.5+qt+stainless+steel+bowl

Chicken & Rice for Dogs 101:

Pour 1.5 cups of water into the pressure cooker pot. Place the desired amount of chicken breasts into the pot. They can be fresh or frozen but need to be placed in one layer. Place a trivet over the top of the chicken. Ideally, the legs of the trivet should rest on the pot, not on top of the chicken, so shimmy it around until it feels right.

In a 1.5 qt. heatproof bowl, combine 1 cup rinsed white rice with 1 cup water. It's very important to rinse the rice to reduce stickiness. Place the bowl on top of the trivet: 


Remove lid.  Look how perfectly the rice cooked!


Remove bowl of rice and fluff with a fork.  Remove chicken from pot and shred. Once cooled, serve according to the ratio and frequency recommended by your veterinarian.


Friday, August 9, 2019

Pressure Cooker Rice Pudding


Whether served warm or chilled, this is the creamiest, easiest rice pudding you'll ever make.


Pressure Cooker Rice Pudding

Yield:  8 servings
Approximate Total Time:  30 minutes plus chilling time
Electric Pressure Cooker Size:  6 quarts

One of my favorite pressure cooker recipe authors is Barbara Schieving.  Author of several cookbooks, she also has a blog called Pressure Cooking Today, which is where the recipe and video for Pressure Cooker Rice Pudding can be found: https://www.pressurecookingtoday.com/the-best-pressure-cooker-rice-pudding/

Friday, August 2, 2019

Perfect Honey Mustard Dipping Sauce


You're only five ingredients away from making the perfect honey mustard dipping sauce right at home!


Perfect Honey Mustard Dipping Sauce

Allrecipes features many fabulous recipes, and one of them is the Perfect Honey Mustard Dipping Sauce recipe found here:


Friday, July 19, 2019

Southwestern Goulash


Southwestern Goulash tastes like fresh Tex-Mex!  With the exception of the cilantro, all the other ingredients are ingredients you probably have on hand making this a quick, easy meal.

Shredded sharp cheddar cheese not pictured.

Southwestern Goulash

Taste of Home has been around for a long time, and there's a reason why!  All the recipes are tested in a test kitchen and feature common ingredients found in most grocery stores.  You can find the Southwestern Goulash recipe on the Taste of Home website: http://www.tasteofhome.com/recipes/southwestern-goulash  Before serving, I top with lots of shredded sharp cheddar cheese and allow it to melt.


Friday, July 12, 2019

Pressure Cooker Mac & Cheese


Classic, cheesy, decadent, and the best part...easy!  Pressure Cooker Mac & Cheese is my go-to recipe for this dish.  No boiling pots of water, no standing over a hot stove, no draining, just homemade goodness in about 35 minutes.

A 16 oz. block of Velveeta is shown, but you will only use half of it.  Water not shown.

Pressure Cooker Mac & Cheese

Yield:  6-8 servings
Approximate Total Time:  35 minutes
Electric Pressure Cooker Size:  6 quarts

4 cups elbow macaroni
4 cups of water
4 tbsp. butter
2 tsp. kosher salt
1/4 to 1/2 tsp. pepper (to taste)*
1 to 2 tsp. dry ground mustard*
1 cup evaporated milk*
2 cups shredded sharp cheddar cheese**
8 oz. Velveeta, cubed

Add macaroni, water, butter, kosher salt, pepper and dry ground mustard to the pressure cooker pot. Stir.  Lock the pressure cooker lid in place and set steam vent to Sealing.  Select PRESSURE COOK (Manual) and cook for 5 minutes on High pressure.  

Once the 5-minute cooking cycle is complete, open the steam vent using the controlled release method (also known as intermittent release). This means you open and close the steam vent in short bursts to prevent the starchy steam/liquid from making a mess. For example:  release, seal...release, seal... release, seal, etc. Once the valve drops, open lid and stir. Then select CANCEL and KEEP WARM.

Stir in the evaporated milk, cheddar cheese, and Velveeta until cheese has melted. Serve.

*Start with 1/4 tsp. of pepper and 1 tsp. of dry ground mustard. Before serving, taste mixture and add additional pepper and/or mustard if desired. More evaporated milk can be added for extra creaminess.

**Don't use pre-shredded cheese as it will not melt smoothly.

Recipe can easily be halved. Cook time remains the same.


Wednesday, July 3, 2019

Chocolate Snack Cake


This easy light chocolate snack cake is so moist and delicious that icing isn't necessary.  It's perfect with a scoop of ice cream, a drizzle of chocolate syrup...or just by itself!


Chocolate Snack Cake

1/4 cup butter, melted
1 cup water
1 egg, beaten
1 tsp. vanilla
1 cup flour
1 cup sugar
3 tbsp. baking cocoa
1 tsp. baking powder
1/2 tsp. baking soda
1/4 tsp. salt
powdered sugar

Preheat oven to 350 degrees.  In a mixing bowl, mix the butter and water.  Add the egg and vanilla; stir well and set aside.  In a separate bowl, combine flour, sugar, cocoa, baking powder, baking soda, and salt.  Add to the egg mixture, and beat on medium speed of electric mixer for 2 minutes.  Batter will be thin.

Pour into a greased 8-in. square baker.  Bake at 350 degrees for 25-30 minutes or until toothpick inserted into the center comes out clean.  Cool on a wire rack.  When completely cool, dust with powdered sugar.


Friday, June 14, 2019

Slow Cooker Italian Beef


Italian Beef originated in Chicago.  This delicious recipe takes a boneless rump roast and cooks it with Italian salad dressing mix and seasonings.  It can be served as a roast (with au jus or "gravy" as Chicago locals would say) or thinly sliced on a sandwich made from Italian bread covered with provolone and roasted sweet or hot peppers if desired.

A 4-packet box of Italian Salad Dressing mix is shown, but you will only need 2 packets.
Slow Cooker Italian Beef

1 3-4 lb. boneless beef rump roast
Salt
Pepper
Garlic Powder
Onion Powder
2 (0.7 oz) packets Good Seasons Italian Salad Dressing & Recipe Mix
1 (10.5 oz) can beef broth
Half of a 16 oz. jar sliced peperoncini peppers 
Optional sandwich ingredients--Italian bread, provolone or sharp cheddar cheese, roasted peppers, etc.

In a 6 qt. slow cooker, place the rump roast fat side up so the fat will drip down into the meat.  Generously season with several shakes of the salt, pepper, garlic powder, and onion powder.  In a bowl, combine the dry Italian dressing with the beef broth and half the jar of peperoncini peppers including some of the juice.  (I use a fork to drain the peppers before adding to the broth mixture and then pour in a small amount of juice.)  Pour this mixture over the rump roast.  Cover and cook on low for 8 hours.  Remove roast from slow cooker and slice thickly if being served as a roast or thinly for sandwiches.  (Meat can also be shredded for sandwiches if desired.)  Place meat back into juices and cook for another hour to hour and a half.


*Recipe adapted from my friend Irene's recipe.

One day, my friend Irene mentioned that she had made Italian Beef for sandwiches.  I had never heard of Italian Beef, but Irene is a fabulous cook, so of course...I had to get the recipe.  We loved it!  We like it best served as a roast with baked potatoes and a side, but it is fabulous served as sandwiches.  Here are a couple of interesting reads on the sandwich:


Friday, June 7, 2019

Catch-a-Husband Blackberry Cobbler


The creator of Catch-a-Husband Blackberry Cobbler, Francine Bryson, says it's what got her a husband, so how could you not want to try this adaptation?  If you're not married, this may just be the ticket.  And if you are married, your husband may propose again.


Catch-a-Husband Blackberry Cobbler

4 tbsp. (1/2 stick) butter, melted
1 1/2 cups baking mix (like Bisquick) 
2/3 cup sugar
2/3 cup whole milk
1 (21 oz.) can blackberry pie filling
1 tbsp. packed light brown sugar
1/2 tsp. sugar

Preheat the oven to 325 degrees.  Pour the melted butter into an 8x8 square baker.  In a 1.5 qt. bowl, stir together the baking mix, sugar, and milk until smooth.  Pour into the baker on top of the butter.  Drop spoonfuls of the pie filling over the batter.  Do not stir.  Sprinkle the brown sugar over the top of the cobbler.  Bake for about an hour or until it's golden brown on top.  Sprinkle 1/2 tsp. of sugar over the cobbler 10 minutes before it’s done.  Serve warm with ice cream.


Fruit cobbler gets its name from the crispy, buttery crust that is formed when baking, which then resembles cobblestone streets common to old villages.  In this recipe, the pie filling will sink to the bottom allowing a beautiful crust to develop on top.