Friday, December 14, 2018

Renita's Peanut Clusters


My sister, Renita, makes the best peanut clusters I've ever eaten.  They are extremely easy to make, turn out perfectly every time, and are a hit with everyone!

One jar of dry roasted peanuts is shown, but you will need two for a full recipe.

Renita's Peanut Clusters

1 (24 oz.) package chocolate flavored almond bark
1 (10 oz.) package Ghirardelli 60% Cacao Bittersweet chocolate chips
1 (12 oz.) package Ghirardelli semi-sweet chocolate chips
2 (16 oz.) jars dry roasted & salted peanuts

Break almond bark up into 4-6 sections so it will melt more easily.  Place almond bark and chocolate chips into a microwave safe bowl (I use a 4-qt. bowl), and microwave at full power for 60 seconds.  Stir thoroughly.  Continue to heat and stir in 30-second increments until the coating is melted and smooth.  Alternately, you can heat the bark and chocolate chips on the stove over medium-low heat stirring often until melted and smooth.  Stir in the peanuts until coated. Drop by tablespoonfuls onto wax paper-lined baking sheets. Refrigerate until served.

Yield:  about 70 peanut clusters

*Recipe may be easily halved.

Note:  I highly recommend using only Ghirardelli chocolate chips.  I've tried other brands, and while good, the Ghirardelli chocolate chips are the best for this recipe.


Friday, November 30, 2018

Black Bottom Cupcakes


Black Bottom Cupcakes are my favorite cupcakes of all time.  A decadent dark chocolate cupcake is filled with a cheesecake/chocolate chip center and topped with pecans.  Make them a day before you plan to serve them, because they're even better the next day!

A 12-oz. bag of chocolate chips is shown, but you will only use half of it.

Black Bottom Cupcakes

Filling:
8 oz. cream cheese, softened
1 egg
1/3 cup sugar
1/8 tsp. salt
6 oz. semi-sweet chocolate chips

Batter:
3 cups flour
2 cups sugar
1/2 cup cocoa
1 tsp. salt
2 tsp. baking soda
2 cups water
2/3 cup vegetable oil
2 tsp. vinegar
2 tsp. vanilla

Topping:
Chopped pecans (if desired)

Preheat oven to 350 degrees.  Prepare muffin pan by lining with muffin liners or by spraying with cooking spray.  With an electric mixer, beat cream cheese until fluffy.  Beat in the egg, sugar, and salt until it is as smooth as possible.  Fold in chocolate chips, and set aside.

In a large bowl (I use a 4 qt.), mix together the flour, sugar, cocoa, salt, and baking soda.  Make a well in the middle of the dry ingredients, and add the water, oil, vinegar, and vanilla. With a whisk or wooden spoon, mix together the dry with the wet ingredients until well combined.

Fill prepared muffin cups 2/3 full of batter, and top with a heaping teaspoon of filling onto the center of each cupcake.  If desired, sprinkle filling portion with desired amount of chopped pecans.

Bake for 20-25 minutes or until cake portion comes out clean with a toothpick.  Let cupcakes cool in pan for 5 minutes before removing and transferring to a wire rack to cool completely. Store in an airtight container.

YIELD:  30 cupcakes


My mom discovered this recipe after I was an adult, but since it became my favorite cupcake recipe, she always made them for my birthday.  Some of my fondest memories are of going to Mom and Dad's house for my birthday and having these cupcakes for dessert. 


Friday, November 16, 2018

Rootitoot Pumpkin Cheesecake


Move over pumpkin pie!  Pumpkin Cheesecake has that pumpkin pie taste, a heavenly smooth texture, and an irresistible gingersnap crust.  Made in the pressure cooker, it's so easy!

Rootitoot Pumpkin Cheesecake

Yield:  6-8 slices
Approximate Total Time:  26 hours 
       (2 hours and then 24 hours of cooling time)

Ruth "Rootitoot" McCusker created this recipe so that it is perfect for everyone including beginners. You can find the recipe on Ruth's website:  https://rootitoot.com/recipes-and-cooking/desserts/pumpkin-cheesecake/

Gail Rose Lam's Cheesecake 101:

A member (Gail Rose Lam) of an Instant Pot Facebook group to which I belong, makes the most beautiful cheesecakes you've ever seen.  She was kind enough to share her technique with me, which is what I used to create the cheesecake in the post photo.  Here are her tips in no particular order along with some I've gleaned along the way:

Friday, November 9, 2018

Better than Cheddar's Broccoli Rice Casserole


This broccoli rice casserole recipe is the perfect dupe for Cheddar's--my favorite side at that restaurant.  Words can't describe how good this is!


Better than Cheddar's Broccoli Rice Casserole

16 oz. frozen, chopped broccoli or broccoli florets
1 cup uncooked long grain rice
2 cups hot water
1/2 tsp. salt
1 tbsp. butter
1 cup chopped onion
1 (10.75 oz) can condensed cheddar cheese soup
2/3 cup milk
16 oz. Velveeta, cubed
1/4 tsp. pepper
2 cups coarsely crushed Ritz crackers (leave several bigger pieces)
4 tbsp. butter, melted

Preheat oven to 350 degrees. Cook frozen broccoli according to package directions. Drain and set aside. If using florets, cut florets into smaller pieces. Combine rice, hot water, and salt in a 2 qt. bowl. Cover, and microwave at HIGH (100%) 5 minutes. Reduce power to MEDIUM (50%). Microwave until liquid is absorbed and rice is tender, 10-13 minutes. Fluff with fork. (Stovetop directions for cooking rice below.) Set aside.

Meanwhile, over medium heat, melt the 1 tbsp. of butter in a large pot. (I use an 8 qt. stock pot.) Add onion and saute until translucent and tender. Stir in soup, milk, Velveeta cheese, and pepper. Cook, stirring frequently, until cheese is melted.

Stir in broccoli and cooked rice. Spoon into a 9x13 baker that has been sprayed with cooking spray. In a 2 qt. bowl, combine the coarsely crushed Ritz crackers with the 4 tbsp. of melted butter. Sprinkle over rice mixture.

Bake uncovered about 30 minutes or until top is golden brown and casserole is bubbly.

Stovetop Method for Cooking Rice: Combine rice, hot water, and salt in a 2 qt. saucepan. Bring to a boil. Turn heat to lowest setting, cover, and set timer for 15 minutes. Fluff with fork.

Click here for printable format


Friday, November 2, 2018

Should I buy an electric pressure cooker (Instant Pot)?


Should I buy an electric pressure cooker, and if so, what brand?  This may be a question you have asked yourself; I know I did.  My answer to you would be a resounding, "Yes!"  

  • The brand Instant Pot with the word "instant" in the name leads people to believe that food is cooked in a matter of minutes, which is a bit of a misnomer in most cases.  By the time you take into account the preparation of ingredients, the pot coming to pressure, the actual cooking time, and then the pressure release, recipes can take as long to cook as they do in traditional ways.  However, you don't have to stand at a hot stove to adjust the heat, stir the contents, or monitor liquid evaporation.  You will usually only have one pot to wash.  While the electric pressure cooker (EPC) does all the work, you can do other things.
  • EPC's excel in cooking things that traditionally take a long time in the oven, slow cooker, or on the stove top like meats, stews, soups, and beans.  Yet they still taste like they've been simmering for hours.
  • The pot's pressure forces liquid into foods making them tender and adding flavor.  Also, when you pressure cook vegetables, you use shorter cooking times, which keep nutrients in the food.
  • You can cook meat from a frozen state.  (This works best with small cuts of meat.)
  • You save money using a pressure cooker over a stove or oven as they use less energy, have shorter cooking times, and my favorite part...they don't heat up your house!
  • EPC's are very safe to use as they have several built-in safety features.  
  • When the pressure cooker time ends, most EPC's switch to the Keep Warm setting, which keeps your food at a safe serving temperature.

Now that I've convinced you to buy one, which brand should you get?  There are many good brands out there--Instant Pot, Mealthy, Fagor, Cosori, etc. My advice is to purchase a brand that has easily available extra parts, accessories, and great customer service.  Go to the website of the brand you're considering and see what is available to purchase.  Contact customer service with a question or two to see how they respond.  Look on Amazon to see if you can purchase parts/accessories, and if the EPC you're considering is available for sale on Amazon, read the reviews.  See if the company has an official FB page and read customer posts.  These suggestions will help you purchase the brand that is right for you.

When I was ready to purchase an EPC using the above criteria, I narrowed my choices down to the Instant Pot Duo Plus and the Mealthy Multipot.  I wanted 9 functions, low/high pressure, a stainless steel pot, and an LCD screen.  Both machines have almost identical buttons, so any recipe I found for one would work for the other.  I ultimately chose the Mealthy Multipot available on Amazon or at https://mealthy.com/.  It offers a lot of bang for the buck with an LCD screen including a cooking graph along with several included accessories like a steamer basket, silicone mitts, and an extra gasket.  I contacted customer service (CS) by chat, phone, and email and received fast, accurate replies.  The best tribute to their CS department is that one time, I called with a question but received a recording stating that their CS reps were busy and to leave a number and message.  I chose not to leave a message, but a few minutes later, a CS rep called back to see if they could help me in any way.   A person can't get a company to call them back when they DO leave a message...let alone when they don't!  I was really impressed by that.

Here is a well-respected blogger's (This Old Gal) opinion of the two machines:  https://thisoldgal.com/mealthy-multipot-and-instant-pot/

Which size and model should I get?  Most recipes are written for 6-quart machines, and that size is great for small families.  If you cook for a lot of people, you might consider an 8-quart.  Adjustments are pretty easy to make for the 8-quart, and you can always cook less in an 8-quart but not more in a 6-quart.  I have a 6-quart, and it is plenty big for the two of us allowing leftovers most of the time.  At this time, Mealthy makes a 6-quart model and an 8-quart model. Instant Pot has several sizes and models explained well in this article:  https://www.hippressurecooking.com/which-instant-pot-model-is-right-for-you/

How do I work this thing?  Because the Mealthy and Instant Pot are so similar, this video will help with either choice!  https://www.youtube.com/watch?v=rjj08liF8aw

First things first--the water test:  To get comfortable using your machine and to make sure it is working correctly, do the water test.  This video shows how:  https://www.pressurecookrecipes.com/instant-pot-water-test/

Now what?  Where do I get accurate recipes?  Your EPC will come with a recipe booklet, but you will find yourself quickly wanting to make more deliciousness!  Until you feel you are knowledgeable about your EPC and what constitutes a good recipe, any of the sites I've used above are trusted sites with many good recipes.  I do not recommend Pinterest.  There are a lot of people posting recipes who have no idea what they're doing, and the recipes will fail.  

In addition, I have found the official Facebook pages for the Instant Pot (Instant Pot Community) and Mealthy (Mealthy Multipot Pressure Cooker Community) to be invaluable.  You'll find the same bloggers mentioned over and over again along with the same recipes.  For example, when someone requests a good recipe for rice pudding, the same recipe is often recommended, because it is good and it works.  And, of course, any recipe I post will be from a trusted site, and I will have made it at least twice to test for accuracy before I post it.

I highly recommend Salsa Chicken Burrito Bowls for your first foray into pressure cooking. In about an hour with very little hands-on time, you'll have a perfectly cooked, complete meal made with 5 ingredients. Prepare to be impressed!

Click here for the recipe!


How do I clean my EPC? Amy and Jacky of Pressure Cook Recipes explain:  https://www.pressurecookrecipes.com/instant-pot-cleaning/  Consult your owner's manual for lid care. 

Jeffrey Eisner of Pressure Luck Cooking also has a good cleaning tips/other information video:  https://www.youtube.com/watch?v=ym-659M6KkE


There is so much more I could write about--what accessories I like, how to customize the presets, trouble-shooting advice, what the different settings mean, cookbooks I like--and I may in a future post.  But a lot of this information is available online if you google it.  I'll leave you with one last video--Pressure Luck Cooking's Top Ten Instant Pot Tips.  Jeffrey Eisner's recipes are fantastic, and he includes videos of them to help you, as well.  https://www.youtube.com/watch?time_continue=15&v=y13_5yaWWjI

If I can help in any way, please reach out.  Happy pressure cooking!

Thursday, November 1, 2018

Pressure Cooker Salsa Chicken Burrito Bowls and Tutorial


If you're new to the pressure cooking (Instant Pot) world, I highly recommend Salsa Chicken Burrito Bowls for your first foray into pressure cooking. In about an hour with very little hands-on time, you'll have a perfectly cooked, complete meal made with 5 ingredients. Prepare to be impressed!

Optional toppings of cheese and cilantro shown.  Salt not shown.

Pressure Cooker Salsa Chicken Burrito Bowls

Yield:  4-6 servings
Approximate Total Time:  1 hour, 5 minutes
Electric Pressure Cooker Size:  6 quarts

1.5 - 2 pounds boneless, skinless chicken thighs, fat removed (breast instructions below*)
Salt
1 (16 oz.) jar salsa
1 cup white rice, rinsed**
Water
Optional toppings:  sour cream, cilantro, black olives, cheddar cheese, green onions, avocado, tomatoes, black beans, etc.

Place the chicken thighs or breasts into the inner pot of the pressure cooker and season with salt.  Pour the entire jar of salsa on top. If it seems really thick, add a splash of water to help the pot come up to pressure; stir.  Place a trivet over the top of the chicken. Ideally, the legs of the trivet should rest on the pot, not on top of the chicken, so shimmy it around until it feels right.

In a 1.5 qt. heatproof bowl***, combine 1 cup rinsed white rice with 1 cup water. It's very important to rinse the rice to reduce stickiness. Place the bowl on top of the trivet.  Lock the pressure cooker lid in place and set steam vent to Sealing. Select PRESSURE COOK (Manual) and cook for 15 minutes on High pressure.  Once the 15-minute cooking cycle is complete, allow the pressure to release naturally, which will take about 13 minutes.

Remove lid.  Remove bowl of rice and fluff with a fork.  Remove chicken from pot and shred; return to pot. If the mixture has more liquid than desired, select CANCEL, and then select SAUTE.  Cook, stirring frequently, until the liquid reduces to your liking. Select CANCEL to turn off SAUTE feature. Place the desired amount of rice into a bowl and top with chicken and optional toppings.

Click here for printable format

Recipe adapted from mealthy.com: https://mealthy.com/cook-smarter/dinner-smarter-salsa-chicken-burrito-bowls-an-intro-to-pot-in-pot-cooking

*1.5 - 2 pounds of boneless, skinless chicken breasts can be substituted if desired.  Increase cook time to 22 minutes.  Approximate total time of recipe will be extended.

**If more rice is desired, increase the rinsed rice to two cups and the water to two cups.  No change in time or size of bowl is needed.

***Because of the high pressure, I recommend a stainless steel bowl for PIP (pot-in-pot) cooking.  This is the one I use:  https://www.amazon.com/Tovolo-Stainless-Steel-Mixing-Quart/dp/B001C0B02E/ref=sr_1_3?ie=UTF8&qid=1539612149&sr=8-3&keywords=1.5+qt+stainless+steel+bowl

Salsa Chicken Burrito Bowls 101:

Place the chicken thighs or breasts into the inner pot of the pressure cooker and season with salt.  Pour the entire jar of salsa on top. If it seems really thick, add a splash of water to help the pot come up to pressure; stir.  Place a trivet over the top of the chicken. Ideally, the legs of the trivet should rest on the pot, not on top of the chicken, so shimmy it around until it feels right:


In a 1.5 qt. heatproof bowl, combine 1 cup rinsed white rice with 1 cup water. It's very important to rinse the rice to reduce stickiness. Place the bowl on top of the trivet. Lock the pressure cooker lid in place and set steam vent to Sealing. Select PRESSURE COOK (Manual) and cook for 15 minutes on High pressure.  Once the 15-minute cooking cycle is complete, allow the pressure to release naturally, which will take about 13 minutes:


Remove lid.  Look how perfectly the rice cooked! Remove bowl of rice and fluff with a fork.  Remove chicken from pot and shred; return to pot:


Place the desired amount of rice into a bowl and top with chicken and optional toppings. Enjoy! :)


Friday, October 26, 2018

Wacky Cake


Wacky Cake has no eggs, no milk, no butter...and is mixed and baked in the same pan.  How easy is that?


Wacky Cake

1 1/2 cups flour
1 cup sugar
3 tbsp. cocoa
1/2 tsp. salt
1 tsp. baking powder
5 tbsp. vegetable oil
1 tbsp. apple cider vinegar
1 tsp. vanilla
1 cup water

Preheat oven to 350 degrees.  Mix dry ingredients in an ungreased 8x8 baker.  Make three holes in the mixture.  Pour the oil in one hole, the vinegar in the second hole, and the vanilla in the third hole.  Pour water over everything and mix.  Bake at 350 degrees for 30 minutes. When cool, dust with powdered sugar, top with icing, or leave plain.


Growing up, my mom made this cake for us all the time.  Sometimes called Depression Cake, it is said that someone during the Great Depression figured out how to make a moist, delicious cake without eggs, butter, or milk as these ingredients were difficult to get.


Friday, October 12, 2018

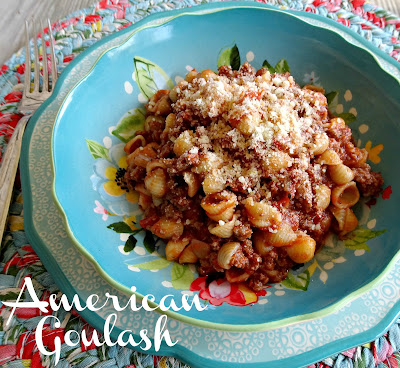
Grandma's American Goulash


This flavorful skillet meal is perfect for weeknight dinners.  It's easy, fast, and made with pantry ingredients.  

A 28 oz. can of crushed tomatoes is shown.  I use half of it and freeze the remaining portion.

Grandma's American Goulash

Brandie of The Country Cook has many fantastic, easy recipes.  The recipe for Grandma's American Goulash can be found on Brandie's website The Country Cook:  https://www.thecountrycook.net/grandmas-goulash/

Notes:

*I use 1 cup of small shell pasta instead of the macaroni and use 93/7 ground beef.

*Recipe can easily be doubled.

Click here to print!

*If made as written and 93/7 ground beef is used, each serving has:


Friday, September 28, 2018

Crock Pot Lemon Garlic Chicken


The classic combination of lemon and garlic proves it's a winner yet again in this mouthwatering chicken dish.


Crock Pot Lemon Garlic Chicken

Brandie of The Country Cook has many fantastic, easy recipes.  The recipe for Crock Pot Lemon Garlic Chicken can be found on Brandie's website The Country Cook:  https://www.thecountrycook.net/crock-pot-lemon-garlic-chicken

Notes:

*I find I need to use more butter and use 4 tablespoons.

*If you prefer a bold lemon flavor, use 1/2 cup of lemon juice.

This chicken is delicious served over brown rice, and I have 2 foolproof recipes for it!

Perfect Pressure Cooker Brown Rice:   http://www.easyaspiecanbe.com/2019/09/perfect-pressure-cooker-brown-rice.html 


Thursday, September 27, 2018

Baked Brown Rice


Foolproof, deliciously perfect brown rice...baked in the oven!


Baked Brown Rice

Food Network is a wonderful place to find a large collection of chefs' recipes.  Alton Brown's Baked Brown Rice can be found there:  https://www.foodnetwork.com/recipes/alton-brown/baked-brown-rice-recipe-1944197#!

Notes:

*I recommend Riceland natural long grain brown rice.  No matter what variety, the Riceland brand cooks perfectly every time.

*I use salted butter.


Friday, September 14, 2018

Rootitoot Cheesecake


Cheesecake is so easily made in a pressure cooker...no water baths, no overly brown tops, no cracks...just pure perfection.


Rootitoot Cheesecake

Yield:  6-8 slices
Approximate Total Time:  26 hours 
       (1 hour, 45 minutes and then 24 hours of cooling time)

Ruth "Rootitoot" McCusker created this recipe so that it is perfect for everyone including beginners. You can find the recipe on Ruth's website:  https://rootitoot.com/recipes-and-cooking/desserts/rootitoot-cheesecake/

Gail Rose Lam's Cheesecake 101:

A member (Gail Rose Lam) of an Instant Pot Facebook group to which I belong, makes the most beautiful cheesecakes you've ever seen.  She was kind enough to share her technique with me, which is what I used to create the cheesecake in the post photo.  Here are her tips in no particular order along with some I've gleaned along the way:

  • I use a 6-qt. pressure cooker.
  • Use Nabisco Honey Maid graham crackers for best results.
  • I use a Fat Daddio's 6x3 springform pan available here:  https://www.amazon.com/Fat-Daddios-Anodized-Aluminum-Springform/dp/B001VEI05G/ref=sr_1_1?ie=UTF8&qid=1536686269&sr=8-1&keywords=fat+daddio%27s+6x3+springform
  • Baking or freezing the crust is not necessary.
  • Pat crumbs firmly in place using a flat-bottomed glass, measuring cup, or tamper.  Stagger the sides to create varying heights.
  • There is no need to warm the filling ingredients to room temperature if you have a food processor.  Put all the cold ingredients (including the eggs) into the food processor at one time and process on high until the sugar is dissolved and everything is incorporated scraping the sides down occasionally.  This will take a few minutes.  No air will be incorporated into the cheesecake filling, so there won't be air bubbles after the cheesecake cooks.
  • For the Creme Fraiche layer:  Whisk together the sour cream or yogurt, sugar and vanilla; spread on the hot cheesecake.  Let cool on wire rack for at least one hour. Lightly cover and place in refrigerator overnight. After the cheesecake has cooled for 24 hours, you can remove the sides and use the back of a spoon dipped in hot water to smooth any side or top imperfections.
  • I use this jumbo spatula that has a thin metal edge to move the cheesecake to a serving piece:  https://www.amazon.com/Wilton-570-1161-Jumbo-Cookie-Spatula/dp/B003CN5SVI/ref=sr_1_15?ie=UTF8&qid=1536687273&sr=8-15&keywords=wilton+cookie+spatula
  • I have two silicone gaskets for my pressure cooker, since the silicone gaskets tend to retain odor.  I use my clear gasket for savory dishes and my red gasket for sweet dishes.

Saturday, September 1, 2018

Pressure Cooker Steel Cut Oats


Perfectly cooked steel cut oats in a little over 30 minutes without babysitting a pot?  It's a snap in a pressure cooker!


Pressure Cooker Steel Cut Oats

Yield:  4 regular or 2 large servings
Approximate Total Time:  35 minutes
Electric Pressure Cooker Size:  6 quarts

1 cup traditional steel cut oats (not quick-cooking)
1/4 tsp. salt
2 1/2 cups cold water

Add all ingredients to the pot and stir to combine.  Close the lid and set the steam vent to sealing.  Pressure-cook for 13 minutes on HIGH pressure.  Release pressure naturally, which will take about 12 minutes.  Open the lid carefully and stir.  Serve with toppings of your choice.


Friday, August 24, 2018

No-Bake Banana Caramel Cream Cheese Pie


This delightful pie has a crunchy graham cracker crust, bananas, cheesecake-type filling, caramel, and is topped with a sprinkling of pecans.  No one will guess that it has only 322 calories* per slice.  If you prefer, you can make it with full fat ingredients and sugar.  It will still be fantastic!

Pecans not pictured.

No-Bake Banana Caramel Cream Cheese Pie

Marlene Koch is known for her healthy, tasty recipes.  This pie recipe is no exception and can be found here:  http://marlenekoch.com/no-bake-banana-caramel-cream-cheese-pie/

Notes:

*I make my own graham cracker crust using this recipe:    http://easyaspiecanbe.blogspot.com/2014/05/graham-cracker-crust-and-tutorial.html

*I substitute 4 ounces (half of an 8 oz. block) Neufchatel cream cheese, softened, for the cream cheeses listed in the recipe.

*I add 2 tablespoons caramel ice cream topping to the top as well as 1 tablespoon chopped pecans. 

*Pie has 322 calories per slice when made as directed using my graham cracker crust recipe.

Click here to print!